Digital Photography
Thursday, December 3, 2015
Sunday, November 22, 2015
Transparency of Life


Transparency
of Life
My
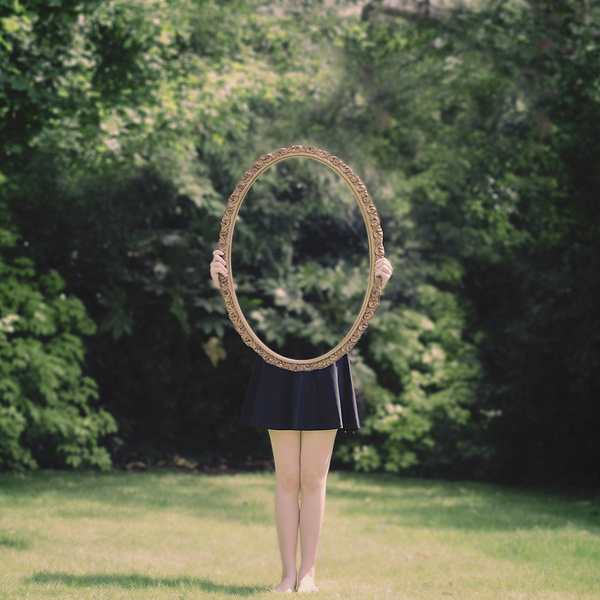
Transparency of Life project is meant to play a trick on the eyes. Most people
will look at it and think that the mirror that the model is holding is showing
a reflection, when in reality, it is showing what is directly behind the mirror
and behind the model. The mirror is looking right through the model, like she
is transparent, it is a portal looking through her body. This view through the
body of the model is also the meaning behind my title, Transparency of Life, as
you are seeing though a human being.
My visual was inspired by two different
artists who created similar pieces. First is Alex Baker who shot a project with
a girl model and a mirror, the mirror appearing to show a reflection but
actually showing what is behind the model. The second photographer, Laura
Williams, did a similar project. Both show the illusion of a reflection in the
mirror, but once you look more closely you can see that it is a continuation of
the background. These inspirational photographs are also elegant and simple at
the same time, which is another aspect I was going for. I didn’t want my
pictures to be overly complex. I used simple settings with simple backgrounds,
for example I used rock walls, Cazenovia Lake, and some structures at a local
Art Park. I also wanted to keep some consistency
in my project, so I kept the same model and the same outfit for all of my
photographs. I feel like consistency is key for certain things, and it plays an
important role in my project.
Tuesday, November 10, 2015
Second Project Inspiration
These two photographs are from a photographer named Alex Baker. I like how these photos look like an optical illusion. The mirrors play a trick on your mind and on your eyes. I want to do something similar to these photographs, with a model and a mirror.
These second photographs are from Laura Williams. Another prime example of mirror photography. I like how simple yet elegant these photos are. And again they look like an optical illusion, which is what I am going for with my project.
Wednesday, October 21, 2015
Tuesday, October 6, 2015
Project 1, The Inspiration
For my first project I want to do a kind of split personality shoot with student-athletes at Cazenovia College. I want to show both sides of their lives, their athlete life and their social life. I found a blog of a photographer named Toby Dixon, where he did something very similar. He called it his Split Personality assignment, but instead of Photoshopping two photos together, he put both personalities on his subject and had one photograph. The following two photos are the ones on his blog that I viewed. My plan is similar except I want to Photoshop my two photographs together.


Wednesday, September 30, 2015
Tone and Color in Photoshop

Before on the left and after on the right.
I
opened this image in Photoshop, and the first step I took was to go
into levels. I took the dark eye dropper and darkened the dark colors,
then took the light eye dropper and lightened the highlights. Next I
went to color balance, where I went to the mid-tones and put the yellow
slider to -60. I did the same for the highlights, since the original
picture was very blue. Last, I went into Hue/Saturation and put the
yellow saturation to +36, the blue to +65 and the reds to +17.
Before on top
After on Bottom
I
pretty much went in the same order as the previous picture. First I
went into levels and darkened the dark colors and lightened the lighter
colors with the eye dropper tool.
Next
I went into color balance, and adjusted for the mid-tones, yellow +21,
and green +21. Last I went to Hue/Saturation and changed the saturation
of the yellows to +27, greens to +33, blues to +79 and magenta's to
+72. I then took the eye dropper with the + and clicked on the pink
flower to bring out that color a little bit more. I made the second
picture brighter and brought out the colors more.
 Before on top.
After on bottom.
First I cropped and straightened the image. Next I took the brightness to 29 and the contrast to 27. Then I went to color balance and took the yellow mid tone to -19, and cyan mid-tone to -9. Next I went to levels and darkened the dark colors and lightened the light colors. Following that, I went to hue and saturation and but the blue saturation to +48. I then selected the sky and increased the saturation of the blues and yellows to make the sky pop a little bit more.
Top before
Bottom after
First I went in and sharpened the image a little bit. Second, I went to brightness and contrast and took the brightness to -8 and the contrast to 12. Next I went to levels and used the eye dropper to darken the dark colors and lighten the light colors. Next was color balance. I put the yellow midtones to -23 and cyan midtone to -9. Last I went into hue and saturation and put the cyan to +39 and yellow to -24.

Top before
Bottom After
 First I went to brightness and contrast and upped the contrast to 99 and
the brightness to 7. Then I selected the lower left corner because it
was way over exposed and bright the brightness and contrast down an bit
to balance it out. Next I went to levels and adjusted it to make it a
little darker because it looked washed out. Then I went into color
balance, and selected the background and took the cyans to - 26.I made a new layerof color balance and included the whole picture, and took yellow to -26. Last, I changed the saturation of the reds to + 27, greens to +20 and cyan to -48.
 Top before
Bottom After
The first step I took was to crop and straighten the image.Then I took the brightness to 9 and the contrast to 49. Following that, I went to levels and darkened the image up. Next I went to color balance and took cyan to -23 and yellow to -14. Finally I added some saturation, red +11 and cyan to +20
Back
light with front light. I took this through a tree, looking at the sun.
I chose to use this photograph because even though there are sun spots,
I liked the way you can see the suns rays coming through the leaves,
and how you can see how green the leaves are with the sun behind them.
Backlight #2
I
started with levels and used the eye dropper to make the darks darker
and lights lighter. I then went to color balance and made the midtones
of yellow -19 since it was a little blue. I brightened it up and took
the contrast up to 44 as well. Next I took the selection of my model and
darkened it up a little with contrast and took the ground and darkened
it up a little bit as well. Next I selected the sky and lightened it up a
tad, and adjusted the mid tones and highlights.
Subscribe to:
Comments (Atom)


